Introduction: Understanding Towel Bars
Knowing how to remove towel bar can be a handy skill for anyone looking to update their bathroom. Towel bars not only serve a functional purpose but also impact your bathroom’s overall aesthetics. Whether you want to repaint, remodel, or replace your towel bar with a more stylish option, understanding the correct removal procedure is crucial. In this article, we will provide you with a simple step-by-step guide, including tools needed and helpful tips to ensure a smooth removal process.
Tools Needed for the Job
How to remove towel bar? Before removing a towel bar, gather the right tools. Having them ready saves time.
Essential Tools and Supplies
Here are the essential tools and supplies you’ll need:
- Screwdriver (Flathead and Phillips): For removing screws from brackets.
- Utility Knife: To cut through adhesive used for glued towel bars.
- Putty Knife: To help pry off adhesive bars gently.
- Pliers: For handling stubborn components or tension bars.
- Level: Useful if reinstalling a new towel bar.
- Wall Patch Kit: For repairing any damage after removal.
- Sandpaper: To smooth patched areas before repainting.
- Paint and Brushes: For touch-ups after repairs.
- Protective Gloves: To shield your hands while working.
Make sure all tools are in good condition. Use a sturdy step stool if needed to reach higher bars. By starting with the right supplies, your work will be quicker and easier.
Preparing for the Removal
Before removing a towel bar, proper preparation is essential. This ensures safety and efficiency.
Safety Tips and Precautions
- Wear Protective Gloves: Protect your hands from sharp edges or rough surfaces.
- Inspect the Area: Check for any electrical wiring or plumbing near the towel bar.
- Use a Sturdy Stool or Ladder: Ensure stability if the bar is high.
- Work Slowly and Carefully: Avoid rushing to prevent injuries or unnecessary damage.
- Keep Tools Organized: Lay out tools in an easy-to-reach spot to avoid distractions.
- Turn Off Power (if needed): If screws or brackets are near wires, cut the power supply.
Following these tips can reduce risks and help in a smooth removal process.
Assessing the Type of Towel Bar Installed
Before starting, identify the type of towel bar. Different bars require different approaches.
- Fixed or Mounted Bars: These are attached using screws or adhesive. Look closely at the brackets.
- Adhesive-Glued Bars: Check for signs of glue around the base or wall.
- Tension or Spring-Loaded Bars: These press against the walls without screws or adhesive.
- Custom or Specialty Bars: Examine unique fixtures to understand how they are secured.
By assessing the towel bar type first, you’ll prepare for the correct removal method.
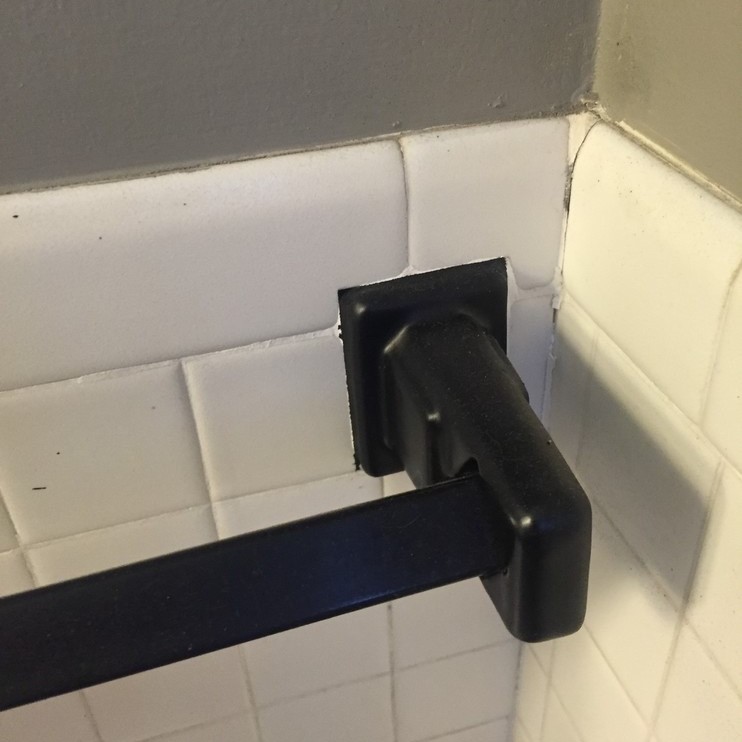
Removing a Fixed Towel Bar
How to remove towel bar? Removing a fixed towel bar requires care to avoid damaging the wall or brackets.
Detaching Screws or Mounting Brackets
- Locate the Screws: Inspect the towel bar brackets for visible screws holding it in place.
- Choose the Screwdriver: Use a matching screwdriver (Phillips or flathead) for the screws.
- Loosen and Remove Screws: Turn each screw counterclockwise until fully removed. Work gently to avoid stripping.
- Detach the Bar: Once screws are out, pull the towel bar and brackets off the wall.
- Examine the Wall: Check for any unexpected damage or leftover hardware after removal.
Handling Adhesive or Glued Bars
- Cut Through the Adhesive: Slide a utility knife around the base to break the adhesive bond.
- Pry Gently with a Putty Knife: Insert a putty knife between the wall and bar base. Work slowly to loosen it.
- Avoid Excessive Force: Apply controlled pressure to prevent wall damage while removing the bar.
- Clean Remaining Adhesive: Use the putty knife to scrape off leftover glue from the wall.
- Inspect for Wall Damage: Check for scratches or holes that may need repairs after removal.
Taking your time with fixed towel bar removal ensures a clean and damage-free process.
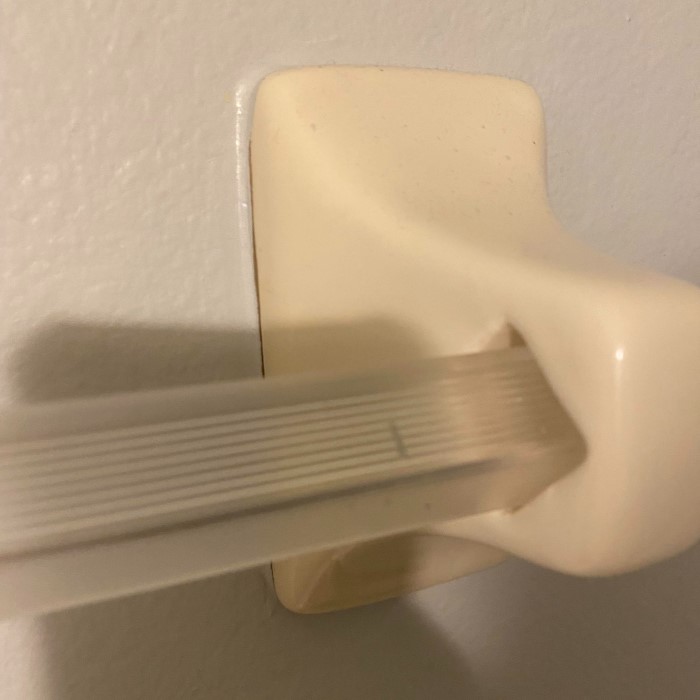
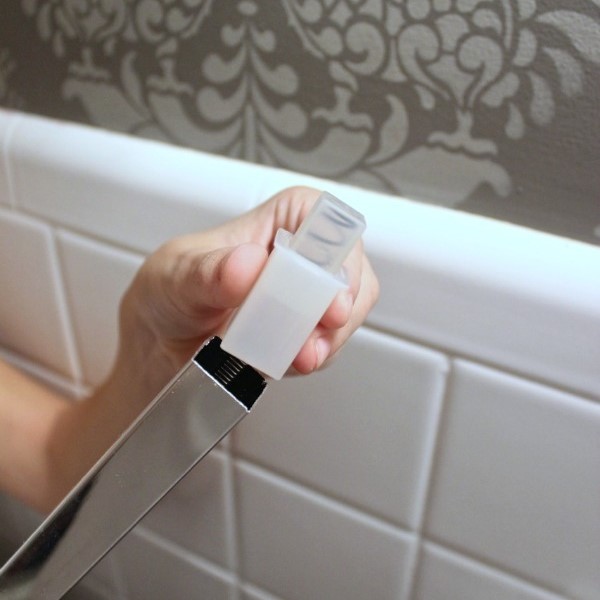
Removing a Tension or Spring-Loaded Towel Bar
Tension or spring-loaded towel bars are often easier to remove compared to fixed bars. However, certain steps ensure a smooth process without causing damage to the wall or nearby fixtures.
Releasing the End Caps
- Identify the End Caps: Locate the protective caps at each end of the towel bar.
- Grip Firmly: Hold the section firmly to prevent accidental slipping while removing the bar.
- Push or Twist the Bar: Apply a slight push or twist to loosen the bar from the caps.
- Release One Side First: Remove one end of the bar from its mounted position.
- Extract the Bar Gently: Slide out the bar from between the walls or brackets.
Ensure to release the end caps slowly to avoid damaging surrounding areas.
Managing Hidden Tension Mechanisms
- Check for Hidden Components: Locate any concealed springs or tension mechanisms inside the bar ends.
- Apply Gentle Force: Compress the tension spring slightly to release the bar from its grip.
- Use Pliers if Needed: If the spring is tight, use pliers carefully to manage tension.
- Protect the Wall: Place a soft cloth between tools and the wall to prevent scratches.
- Remove Slowly: Ease the bar out without applying excessive pressure.
Keeping control over the tension ensures you avoid unnecessary damage during removal. With care, you can quickly and safely remove a spring-loaded towel bar.
Repairing Wall Damage After Removal
How to remove towel bar? After removing a towel bar, you may notice damage to the wall. Repairing the damage ensures a smooth and clean surface for repainting or reinstalling.
Filling Holes and Cracks
- Clean the Area: Remove dust and debris around holes or cracks with a cloth or brush.
- Apply Spackle or Putty: Fill small holes with spackle or putty using a putty knife. For larger cracks, use a wall patch kit.
- Level the Surface: Smooth the spackle with the putty knife and ensure the repair is flush with the wall.
- Let It Dry: Allow the spackle to dry completely before sanding or painting. Drying can take several hours.
- Inspect the Repair: Check the surface and apply another layer if the repair isn’t smooth.
Proper filling ensures a seamless finish without uneven textures after repainting.
Sanding and Repainting the Area
- Sand the Repaired Surface: Use sandpaper to smooth the filled area. Work gently to avoid excess abrasion.
- Clean Up Dust: Wipe the wall with a damp cloth to remove sanding dust before painting.
- Choose Matching Paint: Select a paint color that blends well with the remaining wall.
- Apply Primer if Needed: For larger repairs, use primer for better adhesion and finish before adding paint.
- Paint Evenly: Use a brush or roller to apply paint evenly over the repaired area.
- Allow Time to Dry: Let the paint dry completely to evaluate the consistency and color match.
Taking time to sand and repaint properly restores the wall to its original appearance.
Tips for Reinstalling or Replacing a Towel Bar
After removing a towel bar, installing or replacing one requires proper planning and care. Following these steps ensures the new towel bar is both functional and visually appealing.
Choosing the Right Placement
- Determine Usage Needs: Pick a position that is easily accessible for daily use.
- Assess Wall Strength: Ensure the selected area can support the weight of the towel bar.
- Avoid High Humidity Zones: Stay clear of areas prone to excessive moisture to prevent quick wear.
- Measure Optimal Height: Standard placement is around 48 inches from the floor. Adjust as needed.
- Consider Other Fixtures: Make sure the towel bar doesn’t interfere with other items or fixtures.
- Mark the Location: Use a level to create straight guide marks for precise placement.
Choosing the correct location makes your towel bar easy to use while reducing potential wear issues.
Ensuring Proper Alignment During Installation
Use a Level
- Importance of Leveling: Before securing your towel bar, it’s crucial to ensure it is perfectly straight. This not only enhances the aesthetic appeal but also prevents functional issues.
- Using the Level: Place a level against the towel bar and adjust until the bubble is centered between the lines. This indicates that the bar is horizontally aligned.
- Making Adjustments: If the level shows that the towel bar is not straight, make necessary adjustments to reposition it before moving on to the next step.
Double-Check Measurements
- Verifying Bracket Placement: Before securing the brackets, double-check to ensure that they are evenly spaced according to your original measurements.
- Alignment Checks: Confirm that the brackets are aligned correctly with each other. Inaccurate spacing can lead to an uneven look and can affect the bar’s stability.
- Using a Measuring Tape: Consider using a measuring tape to re-measure the distance between the brackets to ensure accuracy before finalizing their positions.
Secure Brackets Firmly
- Importance of Firm Mounting: It is essential to mount the brackets tightly to prevent a loose or wobbly towel bar, which can lead to frustration and potential damage.
- Tightening the Screws: Use the appropriate screwdriver or drill to secure the screws firmly into the brackets. Ensure there is no movement when attempting to wiggle them.
- Checking for Stability: After securing, give each bracket a gentle tug to confirm they are firmly attached and can endure normal usage without loosening.
Align the Bar
- Sliding the Towel Bar: Carefully slide the towel bar into its mounted brackets. Ensure both ends fit securely within the brackets to achieve even support.
- Confirming Proper Positioning: Once inserted, take a step back to visually inspect whether the towel bar sits level within the brackets.
- Making Adjustments if Necessary: If you notice any misalignment, gently remove the bar and readjust the brackets or reposition it until perfectly aligned.
Test Stability
- Gently Pull the Towel Bar: After securing the towel bar, perform a gentle pull or test on the bar to check its stability.
- Observing Movement: If the bar feels loose or wobbly during the test, examine the installation and make adjustments as needed, ensuring all screws and brackets are secure.
- Safety Check: Testing ensures that the towel bar can withstand regular use without falling or needing future adjustments.
Inspect for Adjustments
- Final Tweaks: After completing the installation, take a moment to inspect the overall installation for any minor adjustments needed.
- Ensuring a Polished Look: Look for gaps, unevenness, or misalignment and make any final tweaks to achieve a polished appearance that complements your space.
- Final Inspection: Walk around and check from different angles to ensure that everything appears as intended before concluding your installation.
Taking care during installation ensures durability and makes your towel bar look professional.
Common Mistakes to Avoid While Removing a Towel Bar
Removing a towel bar requires care and attention. Mistakes can lead to wall damage or frustration. Avoid these common errors to ensure a smooth process.
Overlooking Hidden Components
- Not Checking for Concealed Tension Mechanisms: Some towel bars include hidden springs that require careful handling.
- Ignoring Decorative Caps: End caps often hide screws or tension mechanisms. Look for these before attempting removal.
- Focusing Only on Visible Fixings: Ensure to check for adhesives or mounts that may be hidden underneath.
- Failing to Inspect Both Ends: Examine both sides thoroughly for hidden components to avoid unnecessary force.
- Skipping Oddly Mounted Bars: Specialty or custom towel bars may have unique fasteners needing special tools.
Inspecting hidden or concealed parts ensures a hassle-free removal.
Applying Excessive Force
Using Too Much Pressure on Adhesive Bars
- Applying excessive pressure when prying off adhesive bars can lead to significant damage to the wall surface.
- If too much force is exerted, it may cause the drywall or paint to chip or crack, which could be beyond repair.
- It’s essential to be gentle and use a steady, controlled motion to avoid such damage.
Forcing Screws to Turn
- When you encounter resistance while trying to turn screws, forcing them can lead to stripped screw heads.
- Stripped screws are not only difficult to remove later but might also require specialized tools like screw extractors.
- This can complicate the removal process and may extend the time needed to complete your project.
Pressing Hard Against the Wall
- When using tools such as pliers or utility knives, it’s crucial to avoid pressing too hard against the wall.
- Excessive pressure can result in unintentional gouges or dents in the wall, leading to additional repair work.
- Always maintain a gentle touch to preserve the integrity of the wall surface while performing necessary tasks.
Rushing the Process
- It’s important to work slowly and methodically to ensure that each step is executed properly.
- Rushing can lead to mistakes that could result in damage to your walls or injury to yourself.
- Taking the time to approach the task carefully will facilitate a smoother and safer removal process, minimizing the risk of mishaps.
Neglecting Proper Tools
- Using improper or inadequate tools can lead to a host of problems during the removal process.
- Tools that are not designed for the task at hand can slip, potentially scratching nearby surfaces or damaging existing components.
- Investing in the right tools will help ensure a cleaner, safer job and prevent unwanted surface damage during removal.
Fixing mistakes caused by force takes more time than careful removal. Patience goes a long way in avoiding damage.
Conclusion: Successfully Removing Your Towel Bar
In conclusion, understanding how to remove towel bar can empower you to tackle this DIY project with confidence. By following the step-by-step guide provided, gathering the necessary tools, and adhering to safety tips, you can successfully remove towel bars without hassle.
Whether you’re renovating your bathroom, repairing wall damage, or simply updating your decor, this process can be straightforward and rewarding. Remember to take your time and approach the task methodically. With practice and patience, you’ll become adept at handling similar projects in the future.
Now that you know how to remove towel bar, you’re one step closer to achieving the perfect bathroom space that reflects your style and functionality.