


Understanding Mini Blinds and Their Importance
When it comes to home decor, window treatments play a pivotal role. Mini blinds are a popular choice due to their versatility and functionality. However, many homeowners find themselves wondering how to shorten mini blinds to achieve the perfect fit for their windows. Whether you’ve recently moved into a new space or are simply updating your decor, adjusting the length of mini blinds can significantly enhance the look and feel of your home. In this article, we will explore the importance of properly fitting mini blinds, the steps to shorten them, and tips to consider during the process.
Reasons for Shortening Mini Blinds
There are several reasons why one might need to shorten mini blinds. First, you may have purchased the wrong size, leading to an unsightly overhang. This situation can disrupt the aesthetic appeal of your windows. Second, mini blinds may have been originally installed in a different location, and the new space may have slightly different dimensions. Adjusting the length provides a streamlined look and prevents dust and dirt accumulation, which is common in excessively long blinds.
Additionally, maintaining proper functionality is crucial. When mini blinds are too long, they can hinder the operation of windows, especially if they interfere with window cranks or handles. Therefore, ensuring a proper fit not only improves appearance but also enhances usability.
Tools Needed to Shorten Mini Blinds
Shortening mini blinds requires the right tools for a smooth and safe process. Gathering everything beforehand ensures efficiency and minimizes mistakes.
Essential Tools and Materials
- Measuring Tape: To measure the blinds and determine the correct length.
- Flathead Screwdriver: For removing the blinds from the brackets and handling the cord lock.
- Scissors: For cutting excess cords and slats neatly.
- Pliers: To remove and reposition end caps or lift cords.
- Marker or Pencil: To mark adjustment points on the blinds.
- Work Gloves: To protect your hands during the process.
- Clean Workspace: Cover your table with a cloth to avoid scratches.
Safety Tips for Handling Tools
- Work in a Well-Lit Area: This avoids mistakes and enhances visibility.
- Wear Gloves if Necessary: Gloves protect you from sharp tools and edges.
- Keep Tools Organized: Avoid clutter to reduce the risk of accidents.
- Use Tools Correctly: Follow instructions for each tool to prevent misuse or damage.
- Secure Loose Cords: Prevent cords from tangling or creating tripping hazards.
- Ensure a Stable Surface: Work on a steady table or platform to avoid slips.
Having these tools and using safety precautions will make shortening your mini blinds simple and hassle-free.
Preparing Your Mini Blinds for Shortening
Proper preparation is essential to ensure a smooth process when shortening mini blinds. Taking the time to carefully remove, clean, and measure your blinds will help achieve precise results.
Removing the Blinds from the Window Frame
- Detach Blind Brackets: Use a flathead screwdriver to remove the blinds from their mounting brackets.
- Unhook Lift Cord: Carefully unhook or release the lift cord to free the blinds.
- Place Blinds on Workspace: Lay the blinds flat on a clean, stable workspace to prevent damage.
- Check for Damage: Inspect the blinds for any wear or tear before starting adjustments.
Cleaning and Measuring the Blinds
- Clean the Blinds Thoroughly: Use a gentle cleaner and cloth to remove dust and dirt from slats.
- Check Cord Tangles: Untangle cords to ensure proper functionality during adjustments.
- Measure Blind Length: Use a measuring tape to confirm the ideal length for your window.
- Mark Adjustment Points: Use a marker or pencil to identify areas needing changes.
By following these steps, you set the foundation for successfully shortening your mini blinds.
Determining the Correct Length
Achieving the correct length for your mini blinds is crucial for proper fit and aesthetics. This step ensures your shortened blinds will function effectively and complement your window design.
Measuring for the Desired Blind Length
- Measure Your Window Depth and Height: Use a measuring tape to check both dimensions accurately.
- Decide Placement Preference: Determine how high or low you want the blinds.
- Account for Clearance: Leave enough space for smooth operation and avoid obstructing any hardware.
- Record Measurements: Write down precise numbers to prevent errors.
Taking accurate measurements ensures your blinds will fit perfectly and work seamlessly.
Marking the Adjustment Points
- Lay Blinds Flat: Place the blinds on a clean and stable workspace.
- Use a Marker or Pencil: Highlight areas where you want adjustments.
- Mark Slat Positions: Draw marks at slats you need to remove.
- Note Cord Adjustment Areas: Identify cords requiring length changes.
- Double-Check Alignment: Verify all marks align with measurements.
By carefully marking adjustment points, you simplify and streamline the shortening process.
Techniques to Shorten Mini Blinds
Shortening mini blinds involves removing extra slats and adjusting cord lengths for smooth operation. Following the correct techniques ensures functionality and a proper fit.
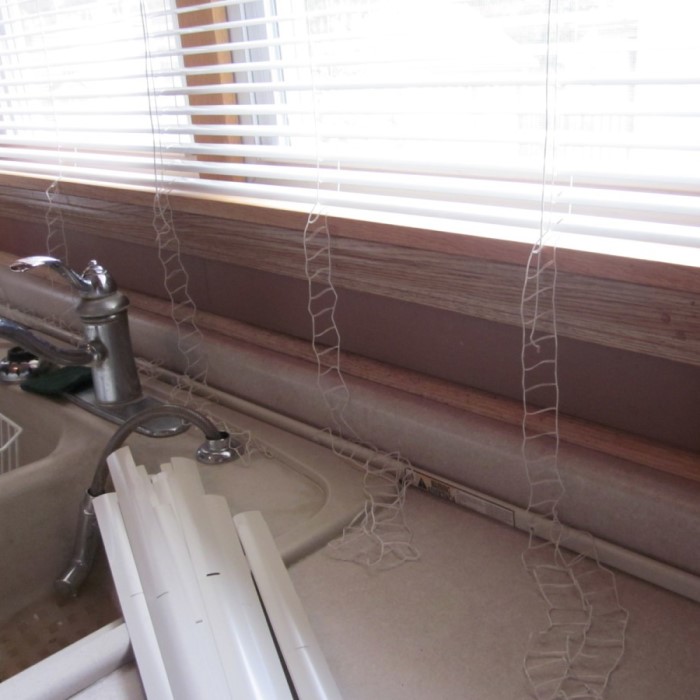
How to Remove Extra Blind Slats
- Lay the Mini Blinds Flat: Place blinds on a stable workspace for better access.
- Remove End Caps: Use pliers to carefully detach the caps from the bottom rail.
- Slide Out Lift Cords: Carefully pull lift cords from the slats you plan to remove.
- Count and Remove Excess Slats: Identify the slats to remove and slide them out one at a time.
- Re-thread the Lift Cord: Thread the cord through the slats you wish to keep.
- Reattach End Caps: Secure the caps on the bottom rail to hold the cords in place.
Removing extra slats ensures your blinds are shortened accurately without compromising their design.
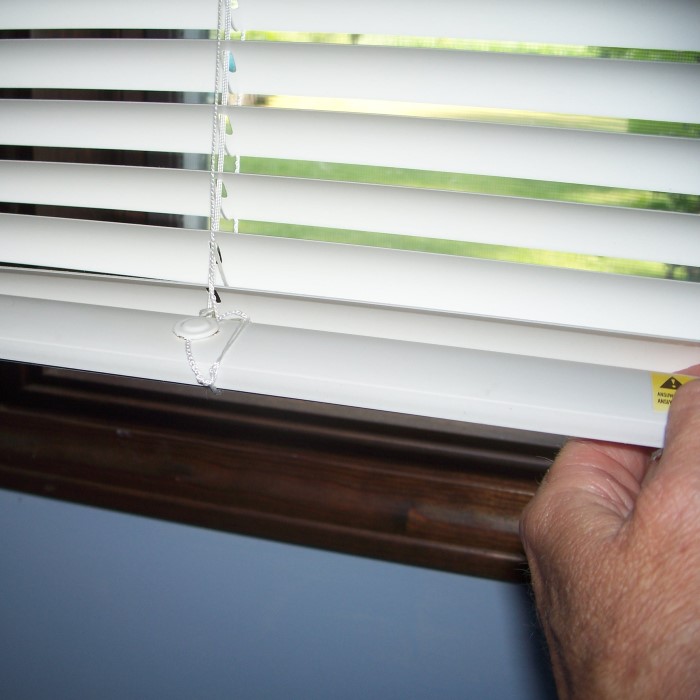
Adjusting Cord Lengths for Proper Functionality
- Unloop Excess Cord: Carefully release the cord from the cord lock mechanism.
- Shorten the Cord: Measure the desired cord length and trim the excess using scissors.
- Seal Cord Ends: Tie knots at the cord ends or use a lighter to seal them.
- Reconnect Cord to Blinds: Insert adjusted cords back into the lift mechanism or cord lock.
- Test Blinds Operation: Raise and lower blinds to confirm smooth functionality.
Proper cord adjustments prevent tangling and ensure safe, easy operation of your mini blinds.
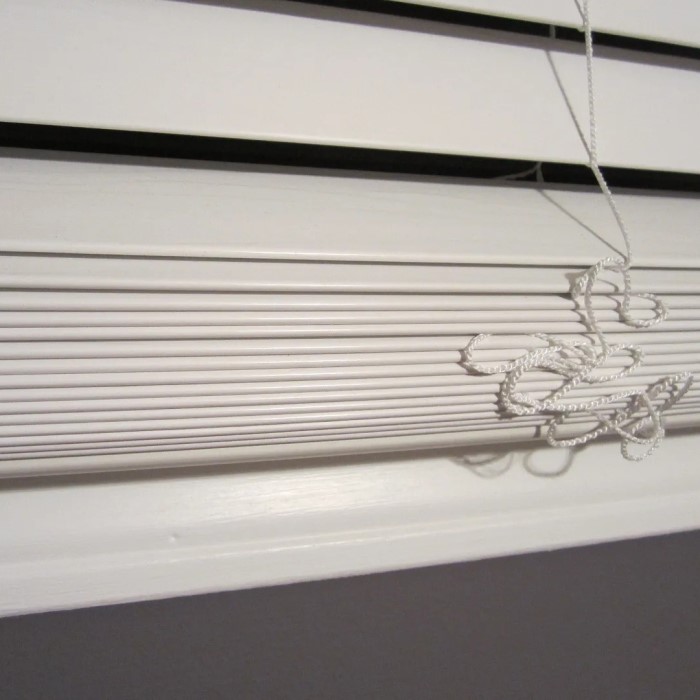
Reassembling and Reinstalling Mini Blinds
Reassembling and reinstalling mini blinds is the final step to ensure proper functionality and fit. Following detailed steps will guarantee smooth and secure installation with minimal hassle.
Step-by-Step Guide to Reassembling
- Attach the End Caps: Secure the end caps back onto the bottom rail.
- Re-thread Lift Cord: Ensure the cord is properly threaded through all remaining slats.
- Tie Cord Ends Securely: Knot the cord ends tightly to prevent slippage.
- Adjust Cord Tension: Test and fix any uneven tension in the lift cords.
- Inspect for Errors: Double-check alignment and functionality before proceeding to installation.
A careful reassembly ensures the mini blinds operate smoothly and maintain their aesthetic.
Tips for Proper Installation
- Align Brackets Correctly: Position the mounting brackets at the original installation points.
- Secure Blinds Firmly: Use a screwdriver to fix the blinds securely in the brackets.
- Test the Lift Mechanism: Raise and lower the blinds to ensure smooth operation.
- Check for Stability: Make sure the blinds do not wobble after installation.
- Clean After Installation: Wipe down the blinds to remove fingerprints or dust.
Proper installation ensures the blinds are safe, functional, and complement your window decor.
Common Mistakes to Avoid
How to shorten mini blinds? Shortening mini blinds can be tricky if certain mistakes are made. Knowing these mistakes helps ensure a smoother process and better results.
Avoid Incorrect Measurements
- Skipping Measurement Steps: Always measure window dimensions before adjusting the blinds.
- Using Inaccurate Tools: Use a quality measuring tape to get precise measurements.
- Overlooking Clearance Needs: Leave room for smooth blind movement and proper fit.
- Failing to Double-Check: Verify all measurements twice to avoid costly errors.
- Marking Wrong Adjustment Points: Ensure marked areas match your intended length.
Taking extra care with measurements prevents improper fitting or damaged blinds.
Ensuring Cord Safety
- Leaving Cords Too Long: Adjust cords to avoid potential hazards, especially for kids and pets.
- Failing to Secure Loose Cords: Always knot or seal cords to prevent tangling.
- Improper Cord Re-threading: Thread cords correctly through slats for smooth functionality.
- Neglecting Cord Mechanisms: Test lift mechanisms to confirm proper operation of adjusted cords.
- Ignoring Safety Regulations: Follow all safety standards for cord adjustments and blind reinstallation.
By focusing on cord safety, you reduce potential risks and ensure smooth operations after adjustments.
Maintenance After Shortening Mini Blinds
Proper maintenance ensures your mini blinds stay clean and functional after shortening. Regular care reduces wear and extends the blinds’ life.
Cleaning Tips for Your Blinds
Dust Regularly:
To keep your blinds looking fresh and clean, it’s important to dust them regularly. Aim to do this weekly to prevent dust buildup.
Use a soft cloth or a feather duster, as these tools are gentle on the surface and effectively capture dust without scratching the slats.
When dusting, approach each slat from different angles to ensure that all areas are covered, as dust can easily settle in hard-to-reach spots.
Vacuum Dust Accumulations:
For a more thorough cleaning, utilize a vacuum cleaner equipped with a brush attachment.
This method is particularly effective for removing accumulated dust that may not be easily reached with a cloth.
Carefully run the brush attachment along each slat, ensuring that you capture any debris trapped between them without causing damage.

Spot-Clean Stains:
Stains can detract from the appearance of your blinds, so it’s beneficial to address them promptly.
Use a damp cloth along with a gentle detergent to wipe away any visible stains.
When spot-cleaning, make sure to dab the area instead of rubbing, as rubbing can spread the stain or damage the surface.
Avoid Abrasive Cleaners:
Be cautious about the cleaning products you use; abrasive cleaners can scratch or damage the slats of your blinds.
Stick to mild soaps or natural cleaning solutions that are effective yet gentle on materials.
Always read product labels and opt for specially formulated cleaners for blinds when necessary.
Clean Cords:
The cords of your blinds can accumulate dust and dirt over time, which can affect their functionality.
Wipe the cords occasionally with a damp cloth to remove any debris and maintain smooth operation.
Regularly checking and cleaning the cords will help prevent any potential tangling or malfunctioning.
Dry Thoroughly:
After cleaning, it’s crucial to ensure that both the blinds and cords are completely dry before reinstalling them.
This step helps to prevent moisture buildup, which can lead to mold or mildew over time.
If you’ve used a damp cloth, use a clean, dry cloth to remove any excess moisture before putting the blinds back up.
Schedule Seasonal Deep Cleaning:
In addition to regular dusting and maintenance, consider scheduling seasonal deep cleaning sessions.
During these sessions, remove the blinds from their mounts and wash them thoroughly according to the manufacturer’s instructions.
This deeper cleaning can rejuvenate the appearance of your blinds and prolong their lifespan.
Consider Material-Specific Care:
Different blind materials require specific care methods. For instance, wood blinds may require special oils or cleaners designed specifically for wood.
Research the specific care instructions for your type of blinds to ensure proper maintenance.
Tailoring your cleaning approach to the material ensures that the blinds remain in excellent condition over time.
Inspect for Damage:
During your cleaning routine, take the opportunity to inspect the blinds for any signs of damage or wear, such as fraying cords or bent slats.
Identifying issues early can help you address them promptly before they lead to more significant problems.
Keep a maintenance log if necessary, noting any repairs needed for future reference.
Keep a Cleaning Kit Handy:
Having a designated cleaning kit for your blinds can make the process more efficient and accessible.
Include soft cloths, a feather duster, gentle detergents, and any other tools you prefer for cleaning.
Accessibility to your cleaning supplies can promote regular upkeep, keeping your blinds looking fresh and well-maintained.
Regular cleaning keeps your blinds looking fresh and functioning properly.
Ensuring Longevity and Proper Functionality
- Check Cord Tension: Inspect the cords frequently to ensure they are not loose or uneven.
- Test the Lift Mechanism: Raise and lower the blinds to confirm smooth operation.
- Reposition Loose Slats: Adjust any slats that move out of place over time.
- Avoid Over-Stressing: Do not pull the lift cord too forcefully.
- Handle with Care: Be gentle when using the blinds to prevent unnecessary wear.
- Inspect for Damage: Periodically check for frayed cords or cracked slats, and repair them promptly.
These tips help your blinds stay functional and maintain their aesthetic appeal over time.
Conclusion
In closing, understanding how to shorten mini blinds can greatly enhance the appearance and functionality of your home. By following the easy steps outlined in this article, you can achieve a perfect fit for your window treatments. Regular maintenance, as discussed, will ensure your blinds remain in excellent condition for years to come. Remember, investing a little time in home improvements pays off in the long run, contributing to a more attractive and efficient living space.

By keeping your mini blinds at the right length and maintaining them, you will enjoy both style and practicality. Now that you know how to adjust your blinds effectively, take the plunge and give your windows the upgrade they deserve!


