


Choosing the right mini blinds for your windows can significantly enhance your home’s aesthetic while providing the necessary privacy and light control. However, before you make this investment, it’s crucial to understand how to measure mini blinds accurately. Taking precise measurements not only saves you time and money but also ensures that your blinds fit perfectly. In this guide, we will break down the entire measuring process, offering tips and insights every homeowner should know.

Tools Needed for Measuring Mini Blinds
How to measure mini blinds? To measure mini blinds accurately, you need the right tools on hand. Here’s a list of essential items:
- Metal Tape Measure: Use a metal tape measure for precise and sturdy measurements. Cloth or plastic tape measures can stretch and lead to errors.
- Pencil or Marker: Keep a pencil or marker ready to note measurements and mark spots on the wall if needed.
- Notebook or Notepad: Record your measurements clearly to avoid confusion later. You can also use a smartphone for this purpose.
- Step Ladder: A step ladder helps you measure higher windows safely and accurately.
- Level: A level helps ensure windows and potential mounts are straight, preventing uneven blinds.
- Masking Tape: If you anticipate needing repeat measurements, masking tape can mark specific points.
Using these tools will simplify the process of measuring mini blinds while improving accuracy. Taking time to prepare the right tools helps make the task quick and ensures better fitting blinds.
Preparing the Window for Measurement
Before you start measuring mini blinds, prepare the window area carefully. This step ensures accurate measurements and simplifies the process.
- Clear the Window Area: Remove curtains, drapes, or existing blinds to access the window frame properly.
- Clean the Window and Frame: Inspect and clean the window frame to remove dirt or obstructions that can affect measurements.
- Check for Damage: Look for cracks or uneven areas in the frame that could impact the fit.
- Identify Mounting Type: Decide if you will use an inside or outside mount. This choice will affect the measurements.
- Ensure Proper Lighting: Make sure the room has enough light to clearly see the window edges and details.
Preparing the window reduces errors and saves time during measurement. Taking these small steps creates a solid foundation for measuring correctly.
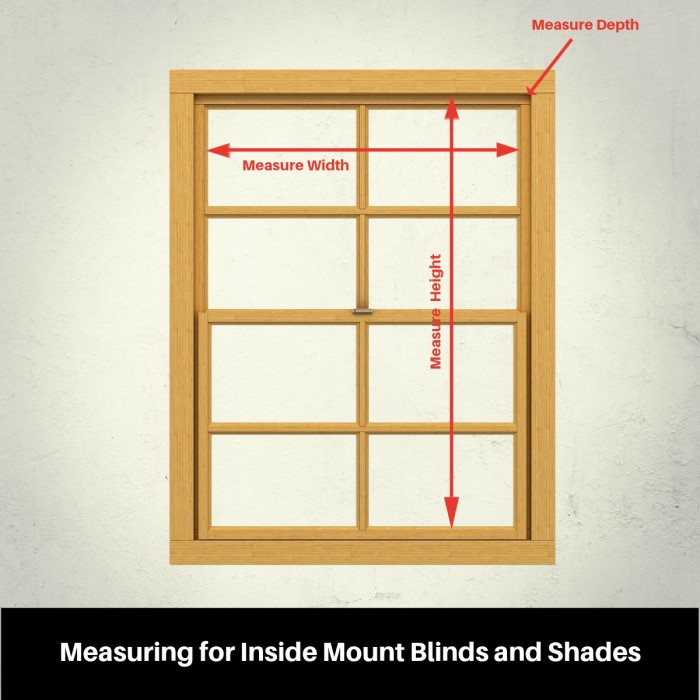
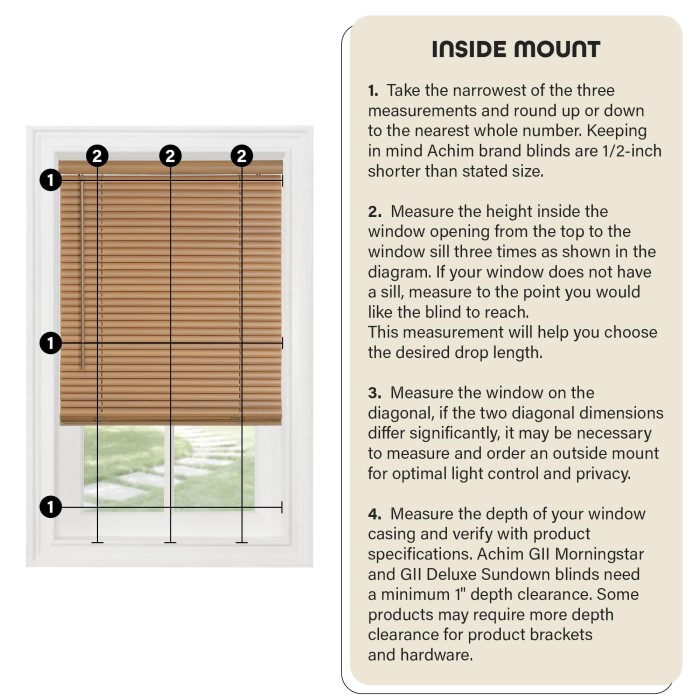
Measuring for Inside-Mount Mini Blinds
Inside-mount mini blinds fit within the window frame, creating a clean and sleek look. Accurate measurement is essential to ensure the blinds fit perfectly.
Techniques to Ensure Accurate Width and Height Measurements
Follow these techniques for precise measurements:
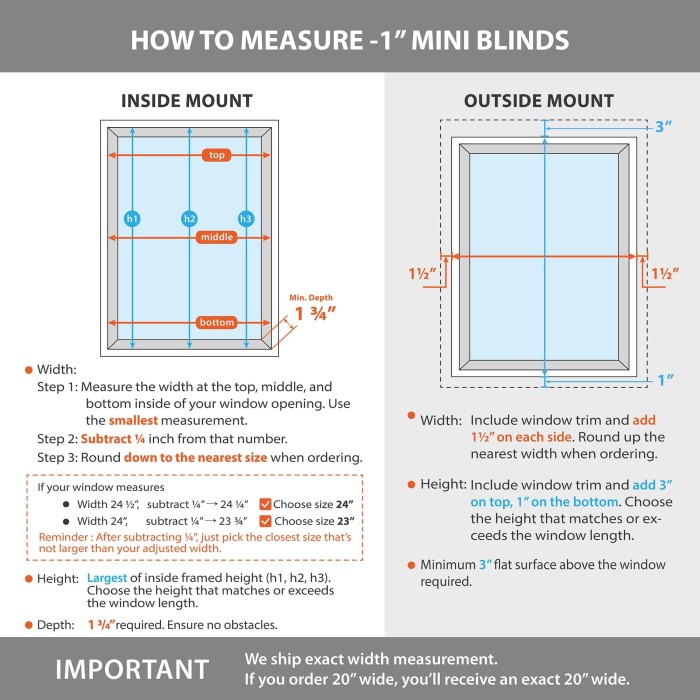
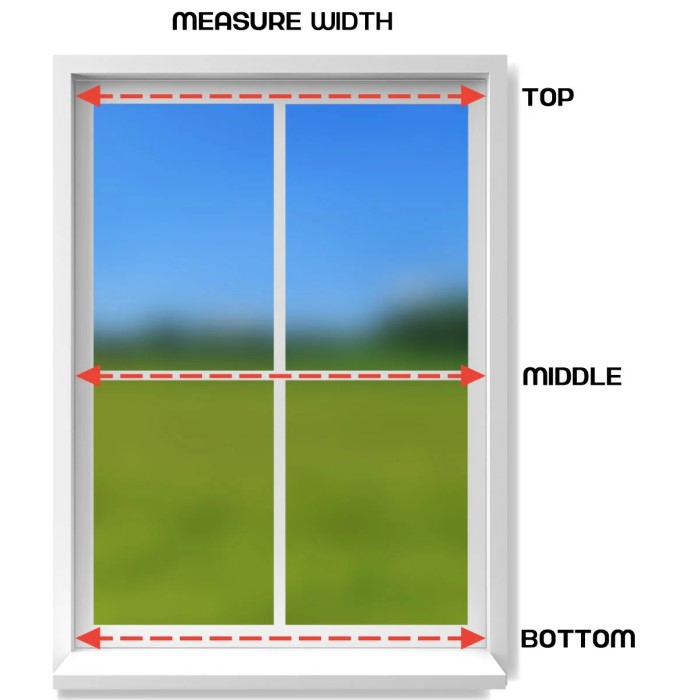
- Measure the Width at Three Points: Measure across the top, middle, and bottom of the frame. Record the smallest width to prevent blinds from being too large and avoid gaps.
- Measure the Height at Three Points: Measure the height of the window on the left, middle, and right sides. Use the largest measurement to ensure full window coverage.
- Use a Metal Tape Measure: Ensure accuracy by using a sturdy metal tape measure, avoiding stretchable materials.
- Account for Obstructions: Check for handles, locks, or uneven surfaces that may affect fitting.
- Double-Check Measurements: Measure twice to confirm your findings. This avoids costly errors and ensures precision.
By using these simple steps, you can guarantee well-fitting inside-mount mini blinds that enhance the look of your window space.
Measuring for Outside-Mount Mini Blinds
Outside-mount mini blinds attach outside the window frame, offering a versatile and dramatic look. These blinds can cover the frame completely, making them ideal for shallow or uneven frames. Accurate measurement ensures proper coverage and a clean appearance.
Adjusting Measurements for Overlap and Coverage
To measure for outside-mount mini blinds, follow these steps:
- Measure the Width Beyond the Frame: Add 2–3 inches on each side of the window frame. This extra width ensures the blinds overlap fully, blocking light and preventing gaps.
- Measure the Height Beyond the Frame: Extend the height 2–3 inches above and below the frame. This adjustment covers the entire opening and enhances privacy.
- Include Space for Mounting Hardware: Account for the space needed for brackets and valances. Ensure they fit securely without interfering with window operation.
- Check for Obstacles: Identify obstacles like window sills, molding, or handles. Adjust measurements to accommodate any obstructions seamlessly.
- Double-Check Measurements: Measure everything twice to confirm accuracy. This prevents errors and ensures a proper fit.
By following these strategies, you can ensure optimal overlap, full coverage, and a secure fit for your outside-mount mini blinds.
Common Mistakes to Avoid When Measuring Mini Blinds
Measuring mini blinds may seem simple but can lead to errors if done incorrectly. Avoid these common mistakes to ensure a perfect fit.
Using the Wrong Measuring Tool
When measuring for mini blinds, it’s crucial to use the right tools. Many people might consider using cloth or plastic tape measures, thinking they are adequate for the job. However, these materials can stretch over time or bend under pressure, leading to inaccurate measurements. Instead, always opt for a sturdy metal tape measure. Metal tape measures provide rigidity and precision, ensuring that your measurements remain consistent and reliable. This small yet significant choice can make a considerable difference when acquiring the perfect fit for your mini blinds.
Not Deciding on Mount Type First
Before taking any measurements, it is essential to determine whether your mini blinds will be mounted inside or outside the window frame. This decision is pivotal as it significantly influences how dimensions are recorded. Inside mounts require precise measurements of the window opening for a snug fit, typically focusing on width and height without accounting for any additional space. Conversely, outside mounts demand extra width and height to ensure the blinds adequately cover the window and prevent light leaks. By deciding on the mounting type first, you can streamline the measuring process and avoid potential errors.
Skipping the Multi-Point Measurement
Accurate measurements are crucial when selecting mini blinds, and one common mistake is forgetting to measure at multiple points. Measuring only once can result in blinds that are incorrectly sized for the window. It’s important to measure the width at three different locations: the top, middle, and bottom of the window. This practice accounts for any irregularities and variations in window width. Similarly, for height, measure at the left, center, and right sides. Taking these multiple points ensures that you obtain the most accurate measurements possible, helping to guarantee that your new mini blinds fit perfectly.
Forgetting to Account for Hardware Space
Another critical aspect often overlooked is the space required for mounting hardware. When measuring for mini blinds, it’s essential to consider the dimensions of the mounting brackets and any other hardware that will be used. Ignoring this space may lead to problems during the installation phase, such as brackets not fitting correctly or the blinds obstructing window mechanisms. Always check the manufacturer’s specifications for the required hardware dimensions, and factor them into your overall measurements to avoid issues later.
Not Accounting for Frame Obstructions
Window frames can sometimes have obstructions that interfere with the fit of mini blinds. Features like handles, locks, or even uneven surfaces can impact how the blinds function or look when installed. Before measuring, take the time to inspect the window and identify any potential obstructions. Note these during the measurement process, and make adjustments accordingly. For instance, you may need to measure differently around a window crank or handle to ensure the blinds will operate correctly without interference.
Neglecting Window Preparation
Preparing the window area prior to measuring is vital for obtaining accurate dimensions. Leaving curtains, shades, or dirt on the frame can lead to imprecise measurements. Dirt can prevent the tape measure from resting flat against the surface, while existing window treatments may obstruct your view of the actual frame size. Always clear away any obstructions and clean the window frame before starting to measure. A clean surface minimizes the chance of error and ensures that you get the most reliable measurements.
Ignoring Measurement Double-Checking
One of the most common mistakes during the measurement process is failing to double-check your dimensions. Skipping this crucial step can lead to costly mistakes that require returning the mini blinds or spending extra money on adjustments. After taking your measurements, it is best practice to recheck each dimension carefully. Comparison of your initial measurements to your recorded values will help identify any discrepancies. Taking the time to double-check ensures that your final measurements are accurate and reliable, ultimately saving you time and effort.
Failing to Consider Overlap for Outside Mounts
When measuring for outside mounts, an often-missed detail is the overlap required to achieve an effective fit. Without including additional overlap, your outside-mounted blinds could leave gaps where light can enter, reducing their effectiveness as a window treatment. As a guideline, always allow for an extra 2 to 3 inches of coverage on all sides of the window. This overlap not only ensures that your blinds adequately cover the window but also provides a neater appearance and enhances privacy.
By considering these expanded points during the measuring process, you can ensure that your mini blinds will fit perfectly, leading to a successful installation and improved home decor.
By avoiding these errors, you can ensure your mini blinds fit perfectly and achieve the desired look for your windows.
Tips for Choosing the Right Mini Blinds Based on Measurements
Selecting the right mini blinds for your space involves more than just accurate measurements. Consider these important tips to ensure a perfect match for your windows and interior decor:
- Match the Mount Style to Your Measurements:
- Choose inside-mount blinds for a sleek look that fits within the window frame.
- Opt for outside-mount blinds to cover the entire frame or for shallow windows.
- Choose the Right Material:
- Use aluminum or vinyl blinds for durability and moisture resistance, ideal for bathrooms and kitchens.
- Select wooden or faux-wood blinds for a warm, elegant look in living areas.
- Consider Light and Privacy Needs:
- Pick mini blinds with tilting slats for adjustable light control.
- Choose blackout blinds for bedrooms where privacy and darkness are essential.
- Account for Room Style and Color:
- Select neutral colors or shades matching your walls for a cohesive look.
- In bold spaces, use blinds as a contrast or statement piece.
- Pay Attention to Slat Size:
- Use smaller slats (e.g., 1-inch) for smaller windows or a minimalist look.
- Choose wider slats for larger windows or to create a modern aesthetic.
- Opt for Energy Efficiency Features:
- Choose blinds with insulating features to reduce energy costs and maintain indoor temperatures.
- Validate with Exact Measurements:
- Double-check your measurements to ensure your chosen blinds will fit perfectly.
- Explore Child and Pet Safety Options:
- Use cordless mini blinds to eliminate hazards for young children and pets.
By considering these factors, you can select mini blinds that are not only functional but also stylish. Tailor your choice to your window type, room needs, and personal style for the best results.
Additional Considerations for Specialty Windows
How to measure mini blinds? Specialty windows include unique shapes, sizes, or designs that need extra care during measurement. Custom mini blinds can enhance the appearance of these windows when measured properly.
Measuring for Arched Windows
- Determine the Arch Height: Measure from the base of the window to the highest point of the arch.
- Measure the Width: Record the widest part of the arch, usually at its base.
- Use Templates for Irregular Shapes: Create a paper or cardboard template to trace unique window shapes accurately.
Addressing Bay Windows
- Measure Each Panel Separately: Break the measurements down for each individual section of the bay.
- Account for Angles: Use a level to confirm angles and avoid uneven blinds.
- Adjust Overlap for Outside Mounts: Add overlap for full coverage of individual bay sections.
Measuring Corner Windows
- Allow Room for Hardware: Leave extra space for brackets where the windows meet.
- Account for Frame Dimensions: Check if the corner framing affects alignment.
- Measure Height and Width for Both Windows: Record measurements for each adjoining window individually.
Handling Skylight Windows
- Measure the Full Frame: Check both the length and width of the skylight frame.
- Consider Depth for Inside Mounts: Ensure the depth allows secure mounting.
- Account for Slant: Use a level to measure accurately if the window is angled.
Double-Check Irregular Measurements
- Confirm Every Point: Ensure all dimensions are accurate without skipping unique areas.
- Use a Metal Tape Measure: Metal tape measures provide consistent, reliable results.
Specialty windows demand precise measurements for mini blinds to fit well and function smoothly.
How to measure mini blinds? Accurate measurements are crucial when ordering mini blinds. Proper documentation and sharing ensure a seamless process. Follow these steps to record and share your measurements effectively:
Techniques for Recording Measurements
- Use a Clear Format: Write each measurement in width x height format for clarity.
- Label Each Window: Identify each window distinctly, such as “Living Room Window A” or “Kitchen Window.”
- Avoid Rounding Off: Record exact numbers instead of rounding to prevent fit issues.
- Group Measurements by Room: Organize measurements room by room for quick reference.
- Double-Check Numbers: Verify every measurement before sending to avoid errors.
- Email the Details: Write a clear email with measurements properly listed. Attach photos if necessary.
- Use Online Forms: Some suppliers provide online portals or forms for submitting measurements. Fill them carefully.
- Provide Templates: For specialty windows, include traced templates of unique shapes to ensure accuracy.
- Attach Reference Notes: Add notes such as mounting preferences or hardware needs to avoid confusion.
- Keep Copies: Save a copy of your measurements for future reference.
Important Tips for Communication
- Be Specific About Mount Type: Specify “inside-mount” or “outside-mount” for each set of blinds.
- Include Color and Material Preferences: Share preferences like color, material, or slat size upfront.
- Confirm Supplier’s Requirements: Check if the supplier needs additional details, such as depth measurements.
- Follow Up After Submission: Confirm receipt of measurements and ask for clarification, if needed.
Proper recording and communication ensure a smooth ordering process and perfectly fitting mini blinds.
Conclusion: Achieving the Perfect Fit for Your Mini Blinds
In conclusion, learning how to measure mini blinds accurately is essential for homeowners looking to enhance their interiors with stylish window treatments. By following this step-by-step guide, you can ensure your mini blinds fit perfectly, enhancing both functionality and aesthetics in your home.
Taking your time to measure thoroughly will save you the hassle of exchanges or returns. A well-fitted mini blind will provide privacy, enhance energy efficiency, and add to the overall beauty of your rooms. Remember to take note of all the measuring tips and techniques provided, and don’t hesitate to reach out for professional advice if needed. Enjoy the process, and happy decorating!


